
Preview first
Preview-first compression workflow
A decision sequence for using frame samples, first-10-second previews, custom ranges, and full renders without wasting time or credits.
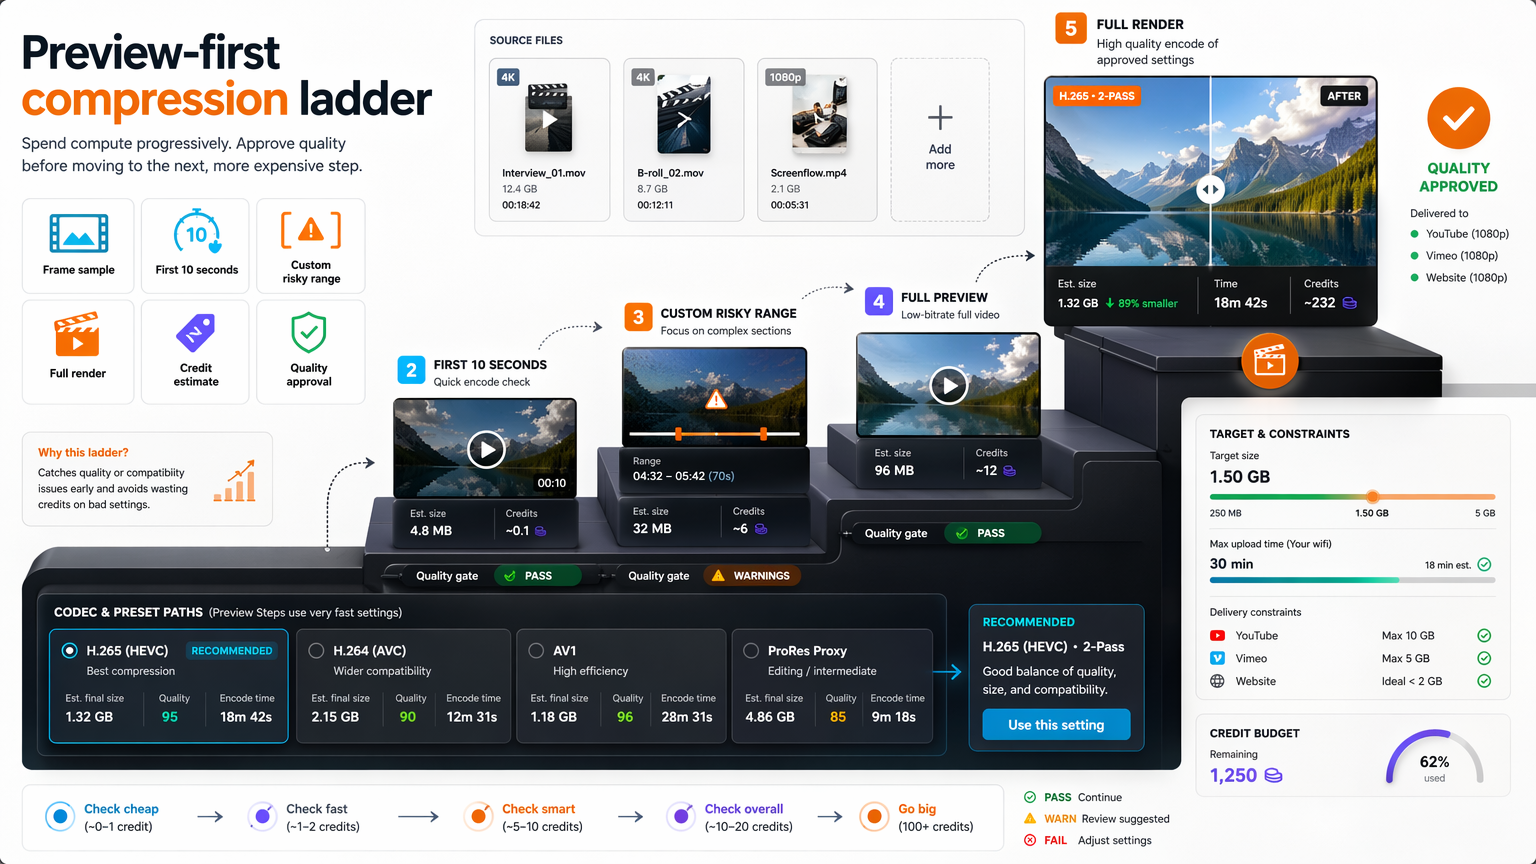
The most expensive habit in compression is using the full render to discover problems. A full encode takes real time and real compute, and if the output is wrong, banding in the dark scene, text that blurred, the wrong aspect ratio, you have spent that budget to learn something a five-second preview would have shown. The full render should confirm a decision; it should not be the first place a mistake becomes visible.
Preview-first is the discipline of moving discovery to cheap probes. You start with a single frame to reject catastrophic settings, move to a short clip to check typical motion and audio, preview the exact risky range if the content demands it, compare size and quality before spending more, and only then commit to the full render. Each step is cheap, each step narrows the risk, and the expensive step happens once, on validated settings.
Section 1Use the full render last
Treat the full render as the final, confirming step, not the exploratory one. It is the most expensive operation in the pipeline, the most time, the most compute, the most credits, so it should run on settings you have already proven, not on a guess. When the full render is where you find problems, every mistake costs a full encode.
This is a reordering of the obvious workflow. Most people compress, watch the result, spot a flaw, change a setting, and compress again, burning a full render per iteration. Preview-first inverts that: probe cheaply, iterate cheaply, and let the full render be the single run that succeeds because everything before it already passed.
The mental model is that a render is a commitment. You commit compute to a set of decisions, and you want those decisions validated before the commitment, not after. The full render is the ceremony at the end; the real work happens in the previews that decide whether it is deserved.
Count the cost: a full render of a long clip might take minutes and a meaningful number of credits, and doing it three times to settle settings triples both. Three cheap previews that arrive at the same settings cost a fraction of one wasted full render. The economics alone make preview-first the rational default, before you even count the time saved waiting.
Section 2Start with a frame sanity check
The cheapest probe is a single decoded frame at the proposed settings. It costs almost nothing and it catches the catastrophic failures that would otherwise waste a full encode: the wrong aspect ratio, swapped or shifted colours, heavy banding, a broken crop, text that is already unreadable. If a single frame is visibly wrong, the whole render would be too.
A frame check is a fast-fail gate. It will not tell you whether motion is smooth or audio is in sync, those need time, but it will tell you whether the basic encode is sound before you spend anything more. Many compression mistakes are obvious on the very first frame; you just have to look at it before queueing the job.
Make the frame check the first thing every workflow does. Decode one frame from the risky section, look at it, and reject or proceed. It takes seconds and it eliminates the entire class of "the whole render was wrong from frame one" failures, which are the most wasteful kind.
Decode that single frame from the hardest moment, a dark scene, a dense text card, not a calm establishing shot. If the colours look right, the crop is intact, and the small text is sharp on that one frame, the basic encode is sound and you can spend your next probe on motion and audio rather than re-checking fundamentals you already cleared.
Use first-10-second previews for normal clips
Once a single frame passes, the next probe is a short render, the first ten seconds, or another short window, which is enough to assess typical motion, transitions, and audio for most content. It is fast and cheap, and it catches the problems a static frame cannot: smearing during movement, banding that only appears across frames, desynced audio, broken fades.
Ten seconds is a deliberate size. It is long enough to include real motion and at least one transition, so it exercises the encoder on the things that actually break, and short enough that it renders in a fraction of the time of the full clip. For a talking-head video, a tutorial, or most content with steady pacing, this window tells you almost everything you need.
Use the short preview to confirm the settings, not to explore them. If the frame check passed and the ten-second preview looks right and sounds right, the settings are very likely correct for the whole clip. The short preview is the workhorse of the preview ladder; it resolves most jobs without ever needing the riskier, more expensive steps.
For a typical tutorial, a steady screen recording with a voiceover, a ten-second preview that confirms the text stays sharp through a scroll and the audio stays in sync is usually all the validation you need. You queue the full render with confidence, having spent seconds and cents instead of minutes and dollars to learn the same thing.
Pick a custom range for the hardest section
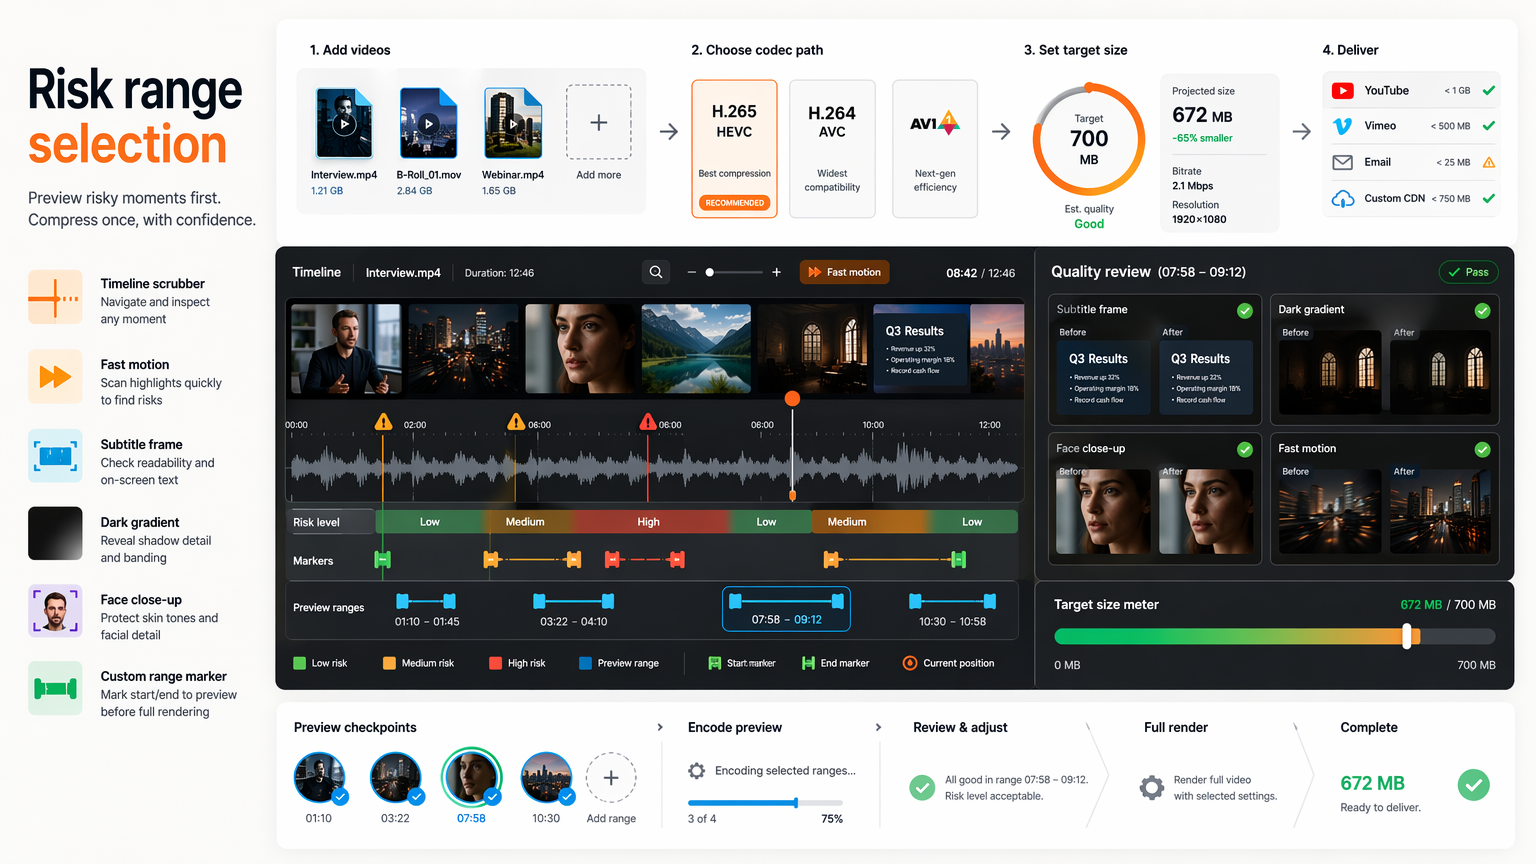
Some content has a section that is harder than the rest, a fast pan, dense confetti, fine scrolling text, a dark scene with gradients, and the average ten-second window will not represent it. For that content, render a custom preview of the exact risky range. This is the probe that catches the failure the easy windows hid.
Choosing the range is itself the skill. You pick the seconds where the source is most likely to break under compression, not a random middle chunk. That means scrubbing to the busiest motion or the tightest detail and previewing precisely there. A custom-range preview of the hardest section is what separates a confident full render from a hopeful one.
This step is conditional, not universal. Most clips do not need it; the frame and ten-second previews suffice. But when the source has an obvious hard moment, skipping the custom range is how that moment fails in the final export. Match the depth of the preview to the difficulty of the content.
Scrub to the moment you dread, the whip pan, the sparkler exit, the dense scrolling credits, and render exactly that range at the proposed settings. If it survives, the full render will; if it bands or smears there, you have caught the failure for the cost of a few seconds of preview instead of a full encode plus a re-do.
Section 5Compare size and quality before spending more
Each preview should produce a number, not just an image: how big is the output at these settings? Comparing the size and the quality of successive previews tells you whether you are spending compute well. If a quality increase doubles the size for a barely-visible improvement, that is a bad trade; if a small size cut removes visible detail, that is too far.
This is the economic core of preview-first work. You are buying quality with credits and time, and the previews let you see the price before you pay it in full. Quantify the marginal gain of each setting change, the size delta, the quality delta, and stop when the gain no longer justifies the cost.
Without this comparison, compression becomes a guessing game of "maybe a bit smaller." With it, every decision has a price tag and a visible result, and the final settings are the ones that survived a real cost-benefit check rather than a hunch. The number is what makes the workflow disciplined instead of hopeful.
Read the previews as a table: setting A gives 40MB with sharp text, setting B gives 31MB with slightly soft text, setting C gives 28MB with text starting to break. The jump from B to C saves three megabytes and costs you legibility, a bad trade once you can see it laid out. That table, built from cheap previews, is what stops you from shipping setting C by guesswork.
Document what passed and what failed
Every preview that passes or fails teaches something, and that something is worth keeping. Log the settings, the resulting size, and the reason a preview passed or was rejected. Over time this becomes a team memory: the settings that worked for a talking-head clip, the ones that failed on dense motion, the codec that produced banding in dark scenes.
A decision log turns one-off discoveries into reusable rules. The next time a similar clip comes in, you start from settings that already worked instead of re-probing from scratch. This is what makes preview-first fast on the hundredth clip, not just principled on the first.
The log also surfaces patterns. If the same kind of source keeps failing the same way, that is a signal to adjust a default or a preset, not just to keep working around it. Documenting outcomes is how individual preview results compound into a smarter workflow rather than dissolving into forgotten iterations.
A lightweight log is enough: clip type, settings tried, size, and a one-line verdict. After a few weeks you can see that your talking-head clips reliably pass at one setting and your screen recordings need another, and you stop previewing from zero each time because the log already told you where to start.
Use preview modes in API products
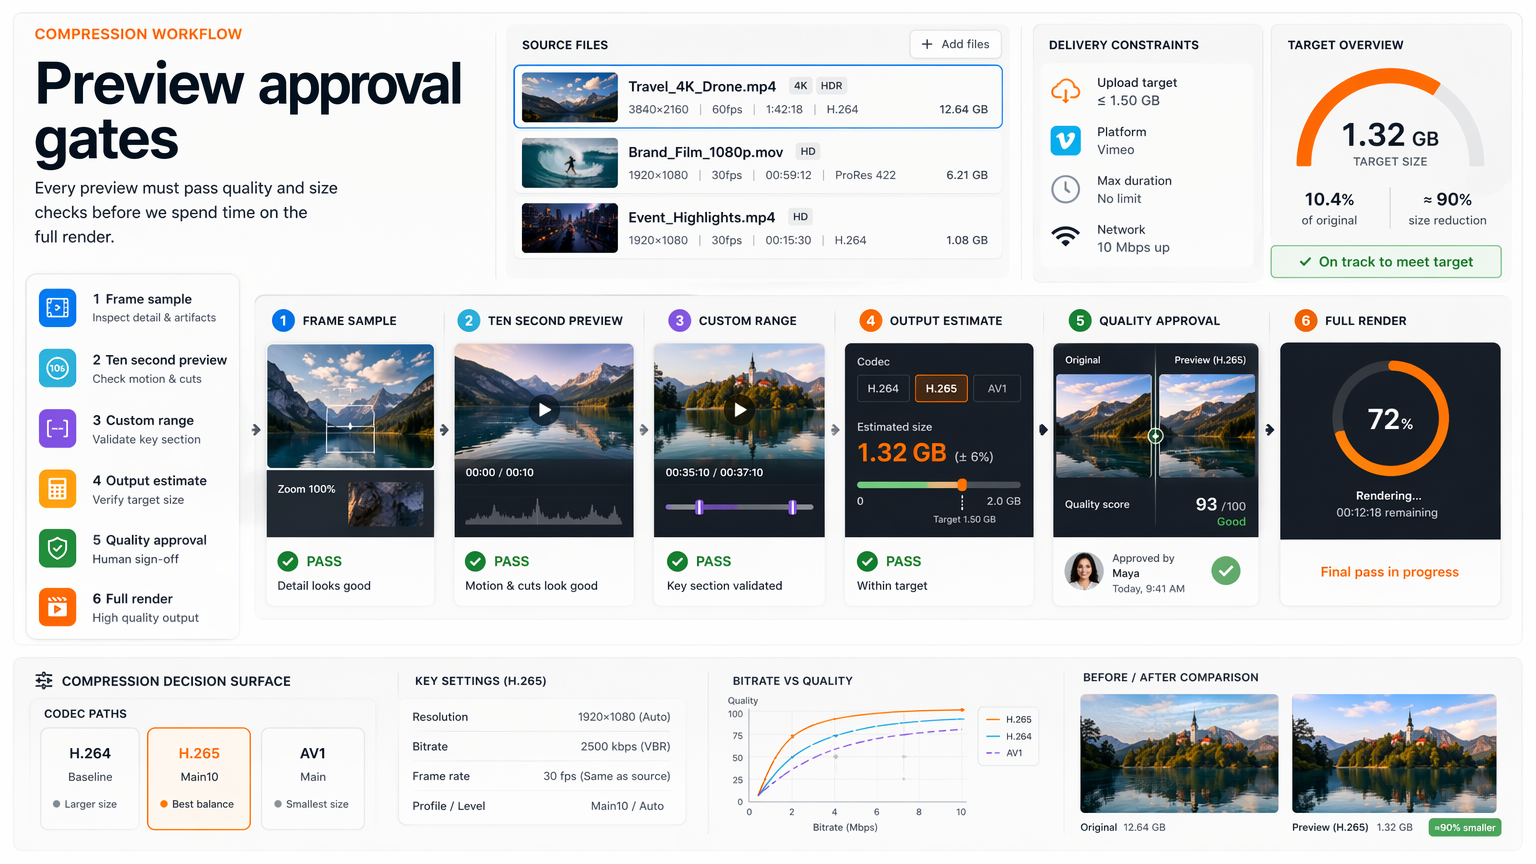
Preview-first is not just a UI habit; it is an API contract. If compression is exposed as a service, the same ladder, frame sample, short clip, custom range, should be available as job types, so integrators can validate settings cheaply before committing to a full render. An API without preview modes pushes every mistake straight into expensive full jobs.
Make previews cheap, fast, and first-class in the API. They should have the same lifecycle as a full job, create, poll, retrieve, just smaller. That lets an integrator insert a validation step before the expensive call using identical code, which is the difference between a product that wastes compute and one that spends it deliberately.
This protects both sides. The integrator's users avoid burning credits on settings that were wrong from the first frame, and the platform avoids running full encodes that will only be rejected. Exposing preview modes in the API is how preview-first scales from a single editor's habit to a property of the whole system.
An API that offers a preview mode lets an integrator build the ladder into their product: request a frame preview, show it, and only call the full render once the user confirms. Without that mode, the integrator's cheapest option is to fire a full render and hope, which burns the platform's compute and the user's credits on every misjudged setting. The preview mode is what makes the whole ecosystem efficient.
Section 8Turn previewing into a repeatable review habit
The value of preview-first comes from consistency, not heroics. Running the ladder, frame, short clip, custom range if needed, size check, then full render, on every source is what makes the workflow reliable. Doing it sometimes and skipping it when you are in a hurry is exactly when the skipped step would have caught the problem.
Standardise the ladder so it is the default, not a decision. Frame check first, always. Short preview next, always. Custom range when the source has a hard section. Size comparison before more spend. Full render last, on validated settings. When the steps are the default, the discipline is free; when each one is a fresh choice, the easy wrong choice wins under pressure.
The payoff is that the full render stops being a gamble. Every expensive encode runs on settings that already passed the cheaper checks, so failures at the final stage become rare instead of routine. Preview-first is, in the end, the habit of respecting how expensive the last step is, and doing the cheap work that makes it count.
Make the ladder the path of least resistance: a preset or a one-click sequence that runs frame, clip, and range previews in order, so doing the right thing takes less effort than skipping it. When the disciplined workflow is also the easy one, people do it every time, and the expensive full-render failures that used to be routine quietly stop happening.
Compression decision checklist
- Reject obvious failures with a frame sample
- Use first-10-second previews for normal clips
- Use custom ranges for the riskiest section
- Compare output size before full spend
- Run the full render only after settings pass review
Preview-first is the habit of finding problems at the cheapest moment that can reveal them. A single frame rejects catastrophic settings, a short clip checks motion and audio, a custom range stress-tests the hardest section, and a size comparison keeps the spend honest, all before the expensive full render runs once, on validated settings. Make the ladder the default path and the discipline becomes free, the full render stops being a gamble, and the failures that used to cost a whole encode get caught in seconds for a fraction of a credit.